上一篇文章我们讲了React-Router的基本用法,并实现了常见的前端路由鉴权。本文会继续深入React-Router讲讲他的源码,套路还是一样的,我们先用官方的API实现一个简单的例子,然后自己手写这些API来替换官方的并且保持功能不变。
本文全部代码已经上传GitHub,大家可以拿下来玩玩:https://github.com/dennis-jiang/Front-End-Knowledges/tree/master/Examples/React/react-router-code
简单示例
本文用的例子是上篇文章开始那个不带鉴权的简单路由跳转例子,跑起来是这样子的:

我们再来回顾下代码,在app.js里面我们用Route组件渲染了几个路由:
import React from 'react';
import {
  BrowserRouter as Router,
  Switch,
  Route,
} from "react-router-dom";
import Home from './pages/Home';
import Login from './pages/Login';
import Backend from './pages/Backend';
import Admin from './pages/Admin';


function App() {
  return (
    <Router>
      <Switch>
        <Route path="/login" component={Login}/>
        <Route path="/backend" component={Backend}/>
        <Route path="/admin" component={Admin}/>
        <Route path="/" component={Home}/>
      </Switch>
    </Router>
  );
}

export default App;
每个页面的代码都很简单,只有一个标题和回首页的链接,比如登录页长这样,其他几个页面类似:
import React from 'react';
import { Link } from 'react-router-dom';

function Login() {
  return (
    <>
      <h1>登录页</h1>
      <Link to="/">回首页</Link>
    </>
  );
}

export default Login;
这样我们就完成了一个最简单的React-Router的应用示例,我们来分析下我们用到了他的哪些API,这些API就是我们今天要手写的目标,仔细一看,我们好像只用到了几个组件,这几个组件都是从react-router-dom导出来的:
BrowserRouter: 被我们重命名为了
Router,他包裹了整个React-Router应用,感觉跟以前写过的react-redux的Provider类似,我猜是用来注入context之类的。Route: 这个组件是用来定义具体的路由的,接收路由地址
path和对应渲染的组件作为参数。Switch:这个组件是用来设置匹配模式的,不加这个的话,如果浏览器地址匹配到了多个路由,这几个路由都会渲染出来,加了这个只会渲染匹配的第一个路由组件。
Link:这个是用来添加跳转链接的,功能类似于原生的
a标签,我猜他里面也是封装了一个a标签。
BrowserRouter源码
我们代码里面最外层的就是BrowserRouter,我们先去看看他的源码干了啥,地址传送门:https://github.com/ReactTraining/react-router/blob/master/packages/react-router-dom/modules/BrowserRouter.js
看了他的源码,我们发现BrowserRouter代码很简单,只是一个壳:
import React from "react";
import { Router } from "react-router";
import { createBrowserHistory as createHistory } from "history";

class BrowserRouter extends React.Component {
  history = createHistory(this.props);

  render() {
    return <Router history={this.history} children={this.props.children} />;
  }
}
在这个壳里面还引用了两个库react-router和history,BrowserRouter仅仅是调用history的createHistory得到一个history对象,然后用这个对象渲染了react-router的Router组件。看起来我们要搞懂react-router-dom的源码还必须得去看react-router和history的源码,现在我们手上有好几个需要搞懂的库了,为了看懂他们的源码,我们得先理清楚他们的结构关系。
React-Router的项目结构
React-Router的结构是一个典型的monorepo,monorepo这两年开始流行了,是一种比较新的多项目管理方式,与之相对的是传统的multi-repo。比如React-Router的项目结构是这样的:
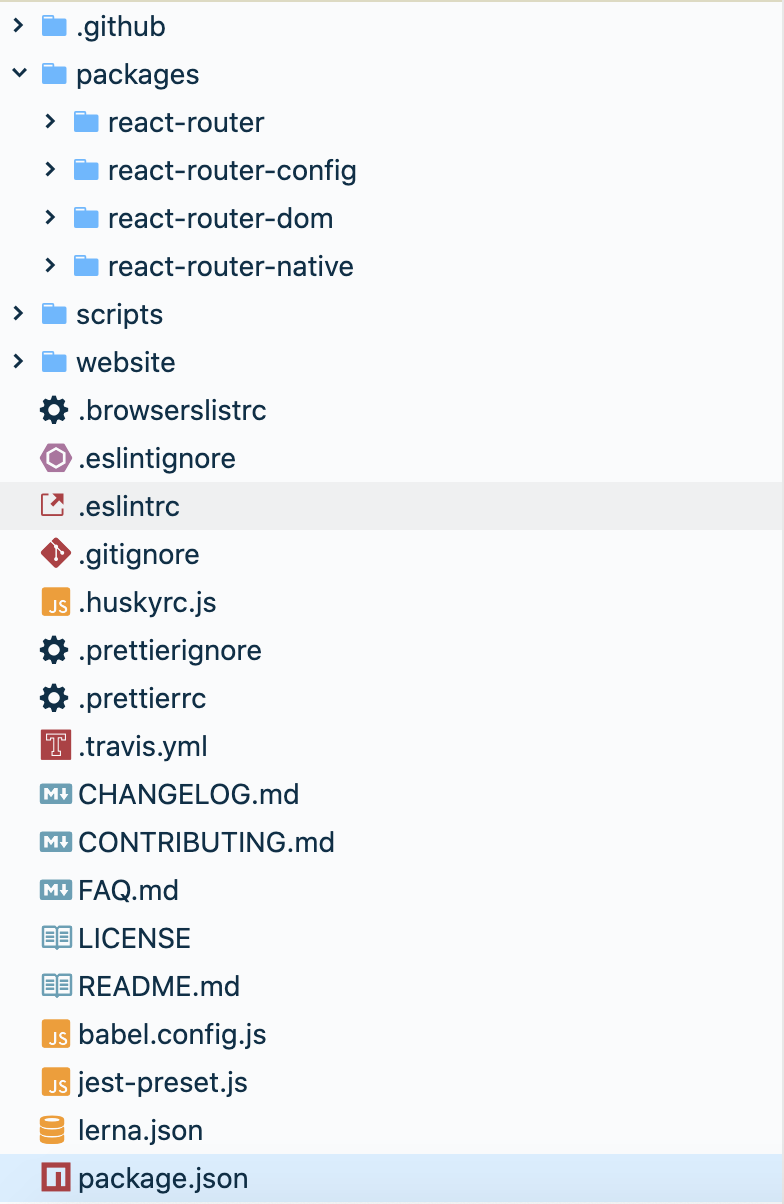
注意这里的packages文件夹下面有四个文件夹,这四个文件夹每个都可以作为一个单独的项目发布。之所以把他们放在一起,是因为他们之前有很强的依赖关系:
react-router:是
React-Router的核心库,处理一些共用的逻辑react-router-config:是
React-Router的配置处理,我们一般不需要使用react-router-dom:浏览器上使用的库,会引用
react-router核心库react-router-native:支持
React-Native的路由库,也会引用react-router核心库
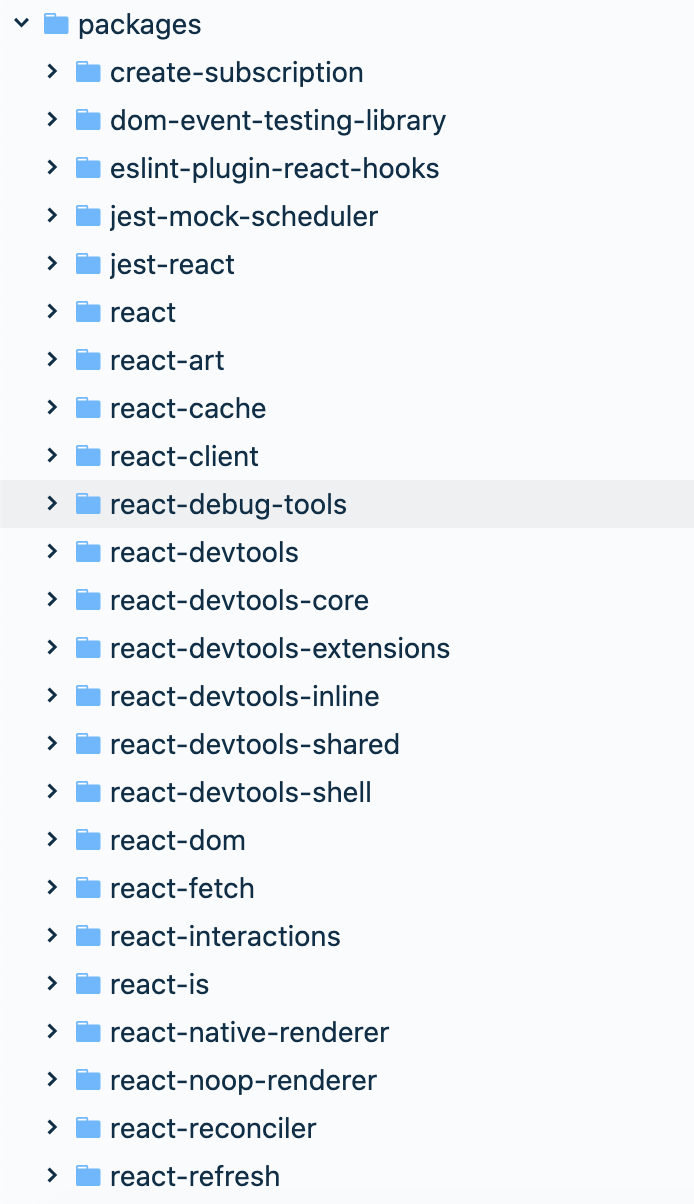
像这样多个仓库,发布多个包的情况,传统模式是给每个库都建一个git repo,这种方式被称为multi-repo。像React-Router这样将多个库放在同一个git repo里面的就是monorepo。这样做的好处是如果出了一个BUG或者加一个新功能,需要同时改react-router和react-router-dom,monorepo只需要一个commit一次性就改好了,发布也可以一起发布。如果是multi-repo则需要修改两个repo,然后分别发布两个repo,发布的时候还要协调两个repo之间的依赖关系。所以现在很多开源库都使用monorepo来将依赖很强的模块放在一个repo里面,比如React源码也是一个典型的monorepo。
yarn有一个workspaces可以支持monorepo,使用这个功能需要在package.json里面配置workspaces,比如这样:
"workspaces": {
    "packages": [
      "packages/*"
    ]
  }
扯远了,monorepo可以后面单独开一篇文章来讲,这里讲这个主要是为了说明React-Router分拆成了多个包,这些包之间是有比较强的依赖的。
前面我们还用了一个库是history,这个库没在React-Router的monorepo里面,而是单独的一个库,因为官方把他写的功能很独立了,不一定非要结合React-Router使用,在其他地方也可以使用。
React-Router架构思路
我之前另一篇文章讲Vue-Router的原理提到过,前端路由实现无非这几个关键点:
- 监听URL的改变
- 改变vue-router里面的current变量
- 监视current变量
- 获取对应的组件
- render新组件
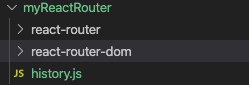
其实React-Router的思路也是类似的,只是React-Router将这些功能拆分得更散,监听URL变化独立成了history库,vue-router里面的current变量在React里面是用Context API实现的,而且放到了核心库react-router里面,一些跟平台相关的组件则放到了对应的平台库react-router-dom或者react-router-native里面。按照这个思路,我们自己写的React-Router文件夹下面也建几个对应的文件夹:
手写自己的React-Router
然后我们顺着这个思路一步一步的将我们代码里面用到的API替换成自己的。
BrowserRouter组件
BrowserRouter这个代码前面看过,直接抄过来就行:
import React from "react";
import { Router } from "react-router";
import { createBrowserHistory as createHistory } from "history";

class BrowserRouter extends React.Component {
  history = createHistory(this.props);

  render() {
    return <Router history={this.history} children={this.props.children} />;
  }
}

export default BrowserRouter;
react-router的Router组件
上面的BrowserRouter用到了react-router的Router组件,这个组件在浏览器和React-Native端都有使用,主要获取当前路由并通过Context API将它传递下去:
import React from "react";

import HistoryContext from "./HistoryContext.js";
import RouterContext from "./RouterContext.js";

/**
 * The public API for putting history on context.
 */
class Router extends React.Component {
  // 静态方法,检测当前路由是否匹配
  static computeRootMatch(pathname) {
    return { path: "/", url: "/", params: {}, isExact: pathname === "/" };
  }

  constructor(props) {
    super(props);

    this.state = {
      location: props.history.location     // 将history的location挂载到state上
    };

    // 下面两个变量是防御性代码,防止根组件还没渲染location就变了
    // 如果location变化时,当前根组件还没渲染出来,就先记下他,等当前组件mount了再设置到state上
    this._isMounted = false;
    this._pendingLocation = null;

    // 通过history监听路由变化,变化的时候,改变state上的location
    this.unlisten = props.history.listen(location => {
      if (this._isMounted) {
        this.setState({ location });
      } else {
        this._pendingLocation = location;
      }
    });
  }

  componentDidMount() {
    this._isMounted = true;

    if (this._pendingLocation) {
      this.setState({ location: this._pendingLocation });
    }
  }

  componentWillUnmount() {
    if (this.unlisten) {
      this.unlisten();
      this._isMounted = false;
      this._pendingLocation = null;
    }
  }

  render() {
    // render的内容很简单,就是两个context
    // 一个是路由的相关属性,包括history和location等
    // 一个只包含history信息,同时将子组件通过children渲染出来
    return (
      <RouterContext.Provider
        value={{
          history: this.props.history,
          location: this.state.location,
          match: Router.computeRootMatch(this.state.location.pathname),
        }}
      >
        <HistoryContext.Provider
          children={this.props.children || null}
          value={this.props.history}
        />
      </RouterContext.Provider>
    );
  }
}

export default Router;
上述代码是我精简过的代码,原版代码可以看这里。这段代码主要是创建了两个context,将路由信息和history信息放到了这两个context上,其他也没干啥了。关于React的Context API我在另外一篇文章详细讲过,这里不再赘述了。
history
前面我们其实用到了history的三个API:
createBrowserHistory: 这个是用在BrowserRouter里面的,用来创建一个history对象,后面的listen和unlisten都是挂载在这个API的返回对象上面的。
history.listen:这个是用在Router组件里面的,用来监听路由变化。
history.unlisten:这个也是在Router组件里面用的,是
listen方法的返回值,用来在清理的时候取消监听的。
下面我们来实现这个history:
// 创建和管理listeners的方法
function createEvents() {
  let handlers = [];

  return {
    push(fn) {
      handlers.push(fn);
      return function () {
        handlers = handlers.filter(handler => handler !== fn);
      };
    },
    call(arg) {
      handlers.forEach(fn => fn && fn(arg));
    }
  }
}

function createBrowserHistory() {
  const listeners = createEvents();
  let location = {
    pathname: '/',
  };

  // 路由变化时的回调
  const handlePop = function () {
    const currentLocation = {
      pathname: window.location.pathname
    }
    listeners.call(currentLocation);     // 路由变化时执行回调
  }

  // 监听popstate事件
  // 注意pushState和replaceState并不会触发popstate
  // 但是浏览器的前进后退会触发popstate
  // 我们这里监听这个事件是为了处理浏览器的前进后退
  window.addEventListener('popstate', handlePop);

  // 返回的history上有个listen方法
  const history = {
    listen(listener) {
      return listeners.push(listener);
    },
    location
  }

  return history;
}

export default createBrowserHistory;
上述history代码是超级精简版的代码,官方源码很多,还支持其他功能,我们这里只拎出来核心功能,对官方源码感兴趣的看这里:https://github.com/ReactTraining/history/blob/28c89f4091ae9e1b0001341ea60c629674e83627/packages/history/index.ts#L397
Route组件
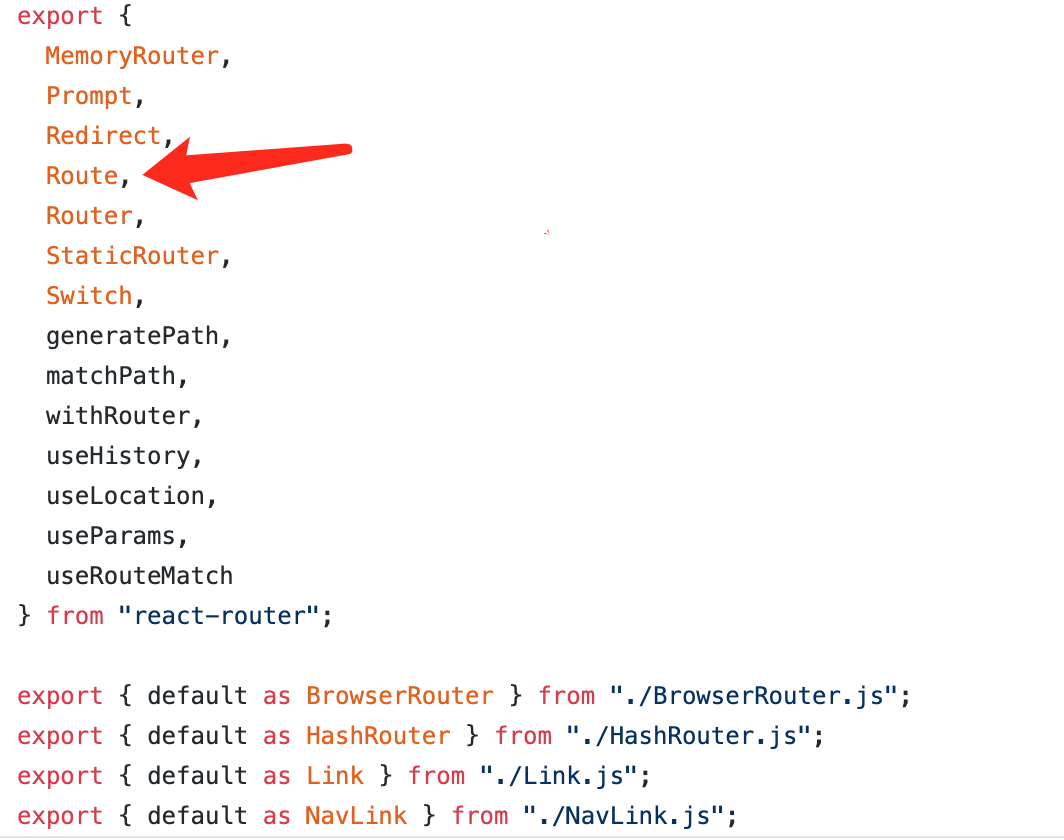
我们前面的应用里面还有个很重要的组件是Route组件,这个组件是用来匹配路由和具体的组件的。这个组件看似是从react-router-dom里面导出来的,其实他只是相当于做了一个转发,原封不动的返回了react-router的Route组件:
这个组件其实只有一个作用,就是将参数上的path拿来跟当前的location做对比,如果匹配上了就渲染参数上的component就行。为了匹配path和location,还需要一个辅助方法matchPath,我直接从源码抄这个方法了。大致思路是将我们传入的参数path转成一个正则,然后用这个正则去匹配当前的pathname:
import pathToRegexp from "path-to-regexp";

const cache = {};
const cacheLimit = 10000;
let cacheCount = 0;

function compilePath(path, options) {
  const cacheKey = `${options.end}${options.strict}${options.sensitive}`;
  const pathCache = cache[cacheKey] || (cache[cacheKey] = {});

  if (pathCache[path]) return pathCache[path];

  const keys = [];
  const regexp = pathToRegexp(path, keys, options);
  const result = { regexp, keys };

  if (cacheCount < cacheLimit) {
    pathCache[path] = result;
    cacheCount++;
  }

  return result;
}

/**
 * Public API for matching a URL pathname to a path.
 */
function matchPath(pathname, options = {}) {
  if (typeof options === "string" || Array.isArray(options)) {
    options = { path: options };
  }

  const { path, exact = false, strict = false, sensitive = false } = options;

  const paths = [].concat(path);

  return paths.reduce((matched, path) => {
    if (!path && path !== "") return null;
    if (matched) return matched;

    const { regexp, keys } = compilePath(path, {
      end: exact,
      strict,
      sensitive
    });
    const match = regexp.exec(pathname);

    if (!match) return null;

    const [url, ...values] = match;
    const isExact = pathname === url;

    if (exact && !isExact) return null;

    return {
      path, // the path used to match
      url: path === "/" && url === "" ? "/" : url, // the matched portion of the URL
      isExact, // whether or not we matched exactly
      params: keys.reduce((memo, key, index) => {
        memo[key.name] = values[index];
        return memo;
      }, {})
    };
  }, null);
}

export default matchPath;
然后是Route组件,调用下matchPath来看下当前路由是否匹配就行了,当前路由记得从RouterContext里面拿:
import React from "react";

import RouterContext from "./RouterContext.js";
import matchPath from "./matchPath.js";

/**
 * The public API for matching a single path and rendering.
 */
class Route extends React.Component {
  render() {
    return (
      <RouterContext.Consumer>
        {context => {
          // 从RouterContext获取location
          const location = context.location;
          const match = matchPath(location.pathname, this.props);  // 调用matchPath检测当前路由是否匹配

          const props = { ...context, location, match };

          let { component } = this.props;

          // render对应的component之前先用最新的参数match更新下RouterContext
          // 这样下层嵌套的Route可以拿到对的值
          return (
            <RouterContext.Provider value={props}>
              {props.match
                ? React.createElement(component, props)
                : null}
            </RouterContext.Provider>
          );
        }}
      </RouterContext.Consumer>
    );
  }
}

export default Route;
上述代码也是精简过的,官方源码还支持函数组件和render方法等,具体代码可以看这里:https://github.com/ReactTraining/react-router/blob/master/packages/react-router/modules/Route.js
其实到这里,React-Router的核心功能已经实现了,但是我们开始的例子中还用到了Switch和Link组件,我们也一起来把它实现了吧。
Switch组件
我们上面的Route组件的功能是只要path匹配上当前路由就渲染组件,也就意味着如果多个Route的path都匹配上了当前路由,这几个组件都会渲染。所以Switch组件的功能只有一个,就是即使多个Route的path都匹配上了当前路由,也只渲染第一个匹配上的组件。要实现这个功能其实也不难,把Switch的children拿出来循环,找出第一个匹配的child,给它添加一个标记属性computedMatch,顺便把其他的child全部干掉,然后修改下Route的渲染逻辑,先检测computedMatch,如果没有这个再使用matchPath自己去匹配:
import React from "react";

import RouterContext from "./RouterContext.js";
import matchPath from "./matchPath.js";

class Switch extends React.Component {
  render() {
    return (
      <RouterContext.Consumer>
        {context => {
          const location = context.location;     // 从RouterContext获取location

          let element, match;     // 两个变量记录第一次匹配上的子元素和match属性

          // 使用React.Children.forEach来遍历子元素,而不能使用React.Children.toArray().find()
          // 因为toArray会给每个子元素添加一个key,这会导致两个有同样component,但是不同URL的<Route>重复渲染
          React.Children.forEach(this.props.children, child => {
            // 先检测下match是否已经匹配到了
            // 如果已经匹配过了,直接跳过
            if (!match && React.isValidElement(child)) {
              element = child;

              const path = child.props.path;

              match = matchPath(location.pathname, { ...child.props, path });
            }
          });

          // 最终<Switch>组件的返回值只是匹配子元素的一个拷贝,其他子元素被忽略了
          // match属性会被塞给拷贝元素的computedMatch
          // 如果一个都没匹配上,返回null
          return match
            ? React.cloneElement(element, { location, computedMatch: match })
            : null;
        }}
      </RouterContext.Consumer>
    );
  }
}

export default Switch;
然后修改下Route组件,让他先检查computedMatch:
// ... 省略其他代码 ...
const match = this.props.computedMatch
              ? this.props.computedMatch
              : matchPath(location.pathname, this.props);  // 调用matchPath检测当前路由是否匹配
Switch组件其实也是在react-router里面,源码跟我们上面写的差不多:https://github.com/ReactTraining/react-router/blob/master/packages/react-router/modules/Switch.js
Link组件
Link组件功能也很简单,就是一个跳转,浏览器上要实现一个跳转,可以用a标签,但是如果直接使用a标签可能会导致页面刷新,所以不能直接使用它,而应该使用history API,history API具体文档可以看这里。我们这里要跳转URL可以直接使用history.pushState。使用history.pushState需要注意一下几点:
history.pushState只会改变history状态,不会刷新页面。换句话说就是你用了这个API,你会看到浏览器地址栏的地址变化了,但是页面并没有变化。- 当你使用
history.pushState或者history.replaceState改变history状态的时候,popstate事件并不会触发,所以history里面的回调不会自动调用,当用户使用history.push的时候我们需要手动调用回调函数。history.pushState(state, title[, url])接收三个参数,第一个参数state是往新路由传递的信息,可以为空,官方React-Router会往里面加一个随机的key和其他信息,我们这里直接为空吧,第二个参数title目前大多数浏览器都不支持,可以直接给个空字符串,第三个参数url是可选的,是我们这里的关键,这个参数是要跳往的目标地址。- 由于
history已经成为了一个独立的库,所以我们应该将history.pushState相关处理加到history库里面。
我们先在history里面新加一个APIpush,这个API会调用history.pushState并手动执行回调:
// ... 省略其他代码 ...
push(url) {
  const history = window.history;
  // 这里pushState并不会触发popstate
  // 但是我们仍然要这样做,是为了保持state栈的一致性
  history.pushState(null, '', url);

  // 由于push并不触发popstate,我们需要手动调用回调函数
  location = { pathname: url };
  listeners.call(location);
}
上面说了我们直接使用a标签会导致页面刷新,但是如果不使用a标签,Link组件应该渲染个什么标签在页面上呢?可以随便渲染个span,div什么的都行,但是可能会跟大家平时的习惯不一样,还可能导致一些样式失效,所以官方还是选择了渲染一个a标签在这里,只是使用event.preventDefault禁止了默认行为,然后用history api自己实现了跳转,当然你可以自己传component参数进去改变默认的a标签。因为是a标签,不能兼容native,所以Link组件其实是在react-router-dom这个包里面:
import React from "react";
import RouterContext from "../react-router/RouterContext";

// LinkAnchor只是渲染了一个没有默认行为的a标签
// 跳转行为由传进来的navigate实现
function LinkAnchor({navigate, ...rest}) {
  let props = {
    ...rest,
    onClick: event => {
      event.preventDefault();
      navigate();
    }
  }

  return <a {...props} />;
}

function Link({
  component = LinkAnchor,  // component默认是LinkAnchor
  to,
  ...rest
}) {
  return (
    <RouterContext.Consumer>
      {context => {
        const { history } = context;     // 从RouterContext获取history对象

        const props = {
          ...rest,
          href: to,
          navigate() {
            history.push(to);
          }
        };

        return React.createElement(component, props);
      }}
    </RouterContext.Consumer>
  );
}

export default Link;
上述代码是精简版的Link,基本逻辑跟官方源码一样:https://github.com/ReactTraining/react-router/blob/master/packages/react-router-dom/modules/Link.js
到这里开头示例用到的全部API都换成了我们自己的,其实也实现了React-Router的核心功能。但是我们只实现了H5 history模式,hash模式并没有实现,其实有了这个架子,添加hash模式也比较简单了,基本架子不变,在react-router-dom里面添加一个HashRouter,他的基本结构跟BrowserRouter是一样的,只是他会调用history的createHashHistory,createHashHistory里面不仅仅会去监听popstate,某些浏览器在hash变化的时候不会触发popstate,所以还需要监听hashchange事件。对应的源码如下,大家可以自行阅读:
HashRouter: https://github.com/ReactTraining/react-router/blob/master/packages/react-router-dom/modules/HashRouter.js
createHashHistory: https://github.com/ReactTraining/history/blob/28c89f4091ae9e1b0001341ea60c629674e83627/packages/history/index.ts#L616
总结
React-Router的核心源码我们已经读完了,下面我们来总结下:
React-Router因为有跨平台的需求,所以分拆了好几个包,这几个包采用monorepo的方式管理:react-router是核心包,包含了大部分逻辑和组件,处理context和路由匹配都在这里。react-router-dom是浏览器使用的包,像Link这样需要渲染具体的a标签的组件就在这里。react-router-native是react-native使用的包,里面包含了android和ios具体的项目。
浏览器事件监听也单独独立成了一个包
history,跟history相关的处理都放在了这里,比如push,replace什么的。React-Router实现时核心逻辑如下:- 使用不刷新的路由API,比如
history或者hash - 提供一个事件处理机制,让
React组件可以监听路由变化。 - 提供操作路由的接口,当路由变化时,通过事件回调通知
React。 - 当路由事件触发时,将变化的路由写入到
React的响应式数据上,也就是将这个值写到根router的state上,然后通过context传给子组件。 - 具体渲染时将路由配置的
path和当前浏览器地址做一个对比,匹配上就渲染对应的组件。
- 使用不刷新的路由API,比如
- 在使用
popstate时需要注意:- 原生
history.pushState和history.replaceState并不会触发popstate,要通知React需要我们手动调用回调函数。 - 浏览器的前进后退按钮会触发
popstate事件,所以我们还是要监听popstate,目的是兼容前进后退按钮。
- 原生
本文全部代码已经上传GitHub,大家可以拿下来玩玩:https://github.com/dennis-jiang/Front-End-Knowledges/tree/master/Examples/React/react-router-code
参考资料
官方文档:https://reactrouter.com/web/guides/quick-start
GitHub源码地址:https://github.com/ReactTraining/react-router/tree/master/packages
文章的最后,感谢你花费宝贵的时间阅读本文,如果本文给了你一点点帮助或者启发,请不要吝啬你的赞和GitHub小星星,你的支持是作者持续创作的动力。
作者博文GitHub项目地址: https://github.com/dennis-jiang/Front-End-Knowledges